Wednesday, January 13, 2016


 Interactive Word Walls

I was sitting in a wonderful on campus training designed for the core teachers on interactive words and I realized my whole room is basically a interactive word wall and yours probably is too. In my district, students take a standardized art test in the fall and spring. The students test scores are tied to my pay, so I had to come up with ways to have information available all year long.

I have all the vocabulary words used through the year posted with a picture, so they can see what the word means.

Poster may be plain, their simplicity actual helps the students to access the information.

You do need have students interact with word wall. I usually pose questions about art work and students look around the room to find the academic vocabulary they need to answer the question.


Winter Landscapes

Value, tint and shade are always interesting to teach to my younger grades. They LOVE to make tints and shades with paint. For this lesson we started by looking at Picasso "le gourmet" and discussing value. I always try to get my kids to bring up the topic we are going to be focusing on. We start by drawing the background with pencil, just drawing wavy lines. Then we get busy with paint. They paint the top section with plain blue, then one person at the table mixes in a little bit of blue to the white. We will be using this for the snow, so try to stress just a little bit of blue. Paint the section on the bottom of the paper, than have another student mix in more blue paint. Students will then paint the next section, repeat till paper is finished.
 Day 2: Shades of green
Fold paper into 4 sections, have students paint one section with plain green. Then have students add black to green and mix and paint the next section.  Repeat until each section is done.
Day 3: Lots of cutting!!
Students will cut the green paper into four sections. I then used templates, and students traced 3 large trees with the light green. Then they used the 2 middle greens to trace as many as medium size trees as possible. Then use the darkest green to trace as many little trees as you can. Then cut, cut, and cut some more. Students will then glue a row of little trees in the back, a row of medium trees next, and then the large trees up front. Use Q tips to make the snow.

Tuesday, October 20, 2015

Geometric Shapes and Organic Shapes

2nd grade is busy finishing their Abstract guitars.

Day 1

We studied geometric and organic shapes. Students compared to shapes and shared how they two shapes are different. I drew a square and a flower. I had to pull a little to get them going. I suggested they look at the types of lines used to create the shapes and then they went from there. Each table shared and then we went into create our definition for organic and geometric shapes.

Students then worked as a group to sort shapes into geometric and organic shapes. I have everyone hold up a geometric shape and I ask one person from each table, how do you know it is geometric. I repeat this but this organic.


We then look at Abstract art, mostly Picasso and Matisse. Students find the different shapes in the picture. We then create the guitar.

1. Fold paper in half vertically.
2. Draw half of the guitar on the folded side. Draw a straight line half way down and the #3
3.Cut and glue
4. Make the circle for the bottom of guitar.

Day 2
We review geometric and organic shapes by restating definitions  and giving examples. We then look at art work decide if the artist used mostly geometric or organic shapes. Tables then do the same sorting activity but this time with works of art(I have postcard size pictures of art). Each table shares one geometric and one organic. Ask them how so you know the artist used ____ shape.

Then we revisit Picasso and Matisse. I show students how to cute shapes and lines out of paper(tingles from the corners or rectangles by cutting a straight line). Each table gets a box of different colors of 4.5x6 paper. The students go to town cutting and gluing. You have to remind them to glue down or clean up time will come and nothing will be glued down.


Day 3
We look at patterns and review lines. Students then create patterns around the outside of guitar. You can get a lot of strange things which can be good. Make sure you show them how to create patters and how to draw a line that stops at the guitar and then picks back up on the other side of the guitar.

I then add glitter for the strings, this is the only time I ever use glitter and the students freak out.

My guitar


Shapes, Architecture, and Famalies

One of my favorite projects for Kinder is using Popsicle sticks to create where they live house, apartment, or whatever they dream of. The first day we talk about how lines become shapes and I sewage into architecture. The students become architects and design their home by using the Popsicle sticks. They must first arrange their home and then I show them how to use the glue(I use different colors of construction paper). I also put pre-cut squares and rectangles so students can add windows and doors. This takes about one 45 minute class. Glue will get all over these, even with the best instruction on how to glue, so don't add details until next class.


The next class I start by having students sit on the floor and we discuss main ideas of art works. I show them a painting by Carmen Lopez Garza  and they tell me what they see, what they think its about, and why they think that. Then we look at other paintings by Carmen Lopez Garza and discuss our families and what we do as a family. If a student says "its a party", I will ask how do you know that. This leads into discussion about details and how they help to tell stories. Students will then draw about their family using their homes they made the week before. I let them use markers for this because they show up great on the construction paper.


Tuesday, August 14, 2012

Glass Bead Magnets

Sometimes it is fun to do some crafts with the students. Usually I will do them the day before break or the last day of school. One of the students favorite is making these little magnets. I get the glass beads at the Dollar Tree, they are in the section with the flowers and vases. The magnets are from Hobby Lobby but they also have them at  Wall-mart. You have to buy the big magnets.

Materials:

Glass Beads, flat on one side
Big Magnets
Stickers, paper, magazines
White Glue
Scissors
Pen


Find a picture in a magazine, put a sticker on a piece of paper,or use a neat pieces of paper. Trace the glass bead on the paper and cut out your image.
Put white glue on the flat side of the bead smear glue to cover surface with finger, Then lay picture face down on the glue.
Cover back with glue and smear with finger, place magnet on top and you are done. Let dry over night.

Wipe off bead with a damp rag if their is dried glue on top. I am going to make some using numbers for another teacher. She is going to use them in a math center. She is going to use old metal pans and the students are going to design their math problems and then let their partner solve it. I think this could also work for letters, I am going to try to use small beads. I will let you know how it turns out.


Monday, August 13, 2012

Open my school...PLEASE

I am ready to get in my room and start putting it together but I  have not gotten the go yet from my principal. My apartment is starting to get over taken by my stuff.


My budget for my school is $0.00.Other teachers have been really good to me at my school, they always bring down the extra supplies the students didn't use and used during the year. It creates extra work at the end of the year but I get watercolors, paper, colored paper, and glue. My district has also proved somethings over the years but this year I going to need to start begging for paint. DonorsChoose has helped me with ceramic supplies. I try not to buy a lot with my own money but I do buy markers, crayons, and pencils.

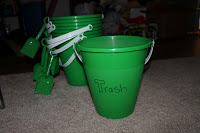
Another thing I picked up for school are green pales for .50 cents each at Micheal's, I am going to use them for trash cans for each table. I bought them in all the same color so no one fights over them. The trash cans work great to keep students in their seats. Great for cutting and when we use colored pencils. I am not sure what I will use the shovels for yet.
 I am also lucking to have a friend that works for Micheal's and Aaron Bother's as a web designer. Once a month the company opens a warehouse for the employees to shop and it is $5 a bag. So she picks out what she wants and then fills the bag for me. It is a lot of random goodness. One of my favorite things I got was giant pipe cleans, I have no idea what to do with them yet but the are so cool.